How to Create a Kitchen Floor Plan with Exact Dimensions for Your Remodel
Creating a functional kitchen floor plan relies on accurate dimensions. With precise measurements, you can design an efficient, organized layout customized to your cooking and lifestyle. Here, we explore the fundamentals of floor plans, standard kitchen sizes, and key factors when planning your layout.
Thoughtful planning, basic drafting skills, and a few handy tools are all it takes to map your dream kitchen. Whether you love entertaining or often cook alone, a tailored floor plan ensures your space suits your needs. Our aim is to provide the framework to maximize your kitchen’s potential.
Basics of Kitchen Floor Plans
A kitchen floor plan is a detailed diagram or sketch showing the layout and dimensions of a kitchen space. It indicates the placement of all fixed elements, including walls, windows, doors, and major appliances. Floor plans are an essential part of designing a kitchen whether building new or renovating.
The purpose of a floor plan is to help visualize and map out an efficient kitchen workflow. With accurate measurements noted, it serves as a helpful guideline for arrangement and spacing as you choose cabinets, countertops, fixtures, and other components. A well-thought-out floor plan ensures your finished kitchen both looks good and functions optimally.
Essential elements to include
An effective kitchen floor plan will include all interior walls, windows, and doorways with proper width measurements noted. Mark the locations of electrical outlets, plumbing hookups, and lighting fixtures. Indicate the spaces for fixed appliances like the refrigerator, stove/oven, and sink at a minimum. For cabinetry, draw outlines for both base and wall units.
If including an island or peninsula, show the overall shape and traffic dimensions around it. Account for small but important elements like trash/recycling bins and specialty storage for knives, pans, and other kitchen tools. Don’t forget to mark any dead space or architectural elements that impact the layout like columns or angled ceilings.
Standard dimensions and layouts
While each kitchen is unique, following general dimensions and layout guidelines helps ensure your floor plan allows for proper workflow. Standard measurements for traffic spaces between counters and islands are 42-48 inches minimum. Allow 15 inches depth for base cabinets and 25 inches for uppers. Include 36-42 inches between the island and other surfaces.
Common layouts like galley, L-shaped, and U-shaped maximize efficiency for multiple cooks. Peninsula islands work well in smaller spaces by separating the kitchen from living areas. Pay attention to the kitchen work triangle between the sink, stove, and refrigerator which should total 26 feet or less.
How to Measure Your Kitchen?
Creating an accurate kitchen floor plan starts with precise measurements of your existing space. Have these essential tools on hand:
- Measuring tape – A 25+ foot retractable metal tape. Look for extended blade length to reach into corners.
- Laser distance meter – Convenient for measuring long walls or high ceilings. Models with Bluetooth sync to smartphones.
- Spirit level – Ensures you measure flat walls, not angles. A must for floor plans.
- Graph paper – Gridded paper helps sketch your layout to scale. 1/4 inch squares work well.
- Pencil and eraser – Draft and adjust measurements and floor plan.
Measuring walls, windows, doors
Carefully measure all permanent kitchen elements:
- Wall lengths – Record height and length of each full wall.
- Windows – Note sill-to-top height and total width including frames. Mark opening direction.
- Doors – Measure width of door itself and total doorway from inside trim to trim. Note swing direction.
- Corner angles – Where walls meet at non-90 degree turns, measure corner-to-corner diagonally.
- Ceiling height – Important for cabinet configurations and clearances.
Measuring for appliances and fixtures
Measure appliances and elements staying or moving into your new kitchen:
- Refrigerator – Overall width and depth including doors, handles, etc.
- Range/cooktop – Width and depth. Allow extra space if slide-in versus freestanding.
- Oven(s) – Individual width, height and depth of each unit.
- Sink – Length and width including surrounding counter area.
- Dishwasher – Width and depth with door closed and fully open.
What are the dimensions of a standard kitchen floor plan?
Typical modern kitchen guidelines recommend:
- 150-200 sq ft for efficient compact kitchens
- 200-250 sq ft for two cooks to work comfortably
- 10×10 ft minimum for one-cook galley layouts
- 4 x 6 ft minimum for sink-stove-fridge work triangle
What is the ideal size for a kitchen?
The best kitchen size depends on your:
- Household size – More users need increased space and storage.
- Cooking habits – Avid cooks benefit from larger prep zones.
- Entertaining plans – Frequent hosts require party serving and cleanup areas.
- Appliance footprint – Bigger fridges, stoves, etc. increase requirements.
- Lifestyle needs – How much do you value kitchen activities?
For most families, 150-200 square feet allows flexibility. Layouts like galley or L-shape work well in compact kitchens.
Key Factors for Designing Your Floor Plan
When designing your floor plan, focus first on creating an efficient kitchen workflow. This means spacing appliances and work zones so cooks can smoothly prep, cook, and clean up. Apply the kitchen work triangle concept:
- The three points of the triangle are the stove, sink, and refrigerator.
- Keep the total triangle perimeter under 26 feet, with each leg 4-9 feet.
- Clear pathways between triangle points for traffic flow.
- Situate cabinets, islands, and other fixtures outside the triangle perimeter.
Optimal room dimensions
Consider these general kitchen dimension guidelines:
- Countertop depth – Standard is 25-26 inches. Provide 30-36 inches for prep areas.
- Aisles – 42-48 inches minimum between counters and islands. Wider for high traffic zones.
- Triangles – 4-9 foot sides with a total perimeter under 26 feet.
- Islands – Allow 36-42 inches of circulation space around islands.
- Doorways – Minimum of 32-36 inches wide. Wider if heavy use.
Allowances for opening doors/appliances
When arranging cabinets and appliances, account for door and drawer clearances:
- Refrigerators – Allow space for doors to open fully and good side access.
- Dishwashers – Leave room for a door to open without hitting adjacent cabinets.
- Wall ovens – Install at least 3 inches from corners for the door swing.
- Microwaves – If over the stove, make sure adequate room to open oven door below.
Ceiling height
Standard kitchen ceiling height is 8 feet. Considerations for taller ceilings:
- Adds a spacious, airy feel.
- Allows for taller wall cabinets and decor.
- Requires adjustable island pendants and lighting fixtures.
- May need a step stool for high cabinets.
Windows and lighting
Strategically place windows and lighting:
- Maximize natural light near prep and sink zones. Supplement with task lighting as needed.
- Include windows with views of family/dining areas to promote openness.
- Light walls and ceilings to create brightness. Accent with recessed lights.
- Use dimmers to adjust light levels for ambiance and activities.
Create Your Own Floor Plan
Sketch initial layout ideas
When starting to design your kitchen floor plan, it helps to sketch out some preliminary ideas to get your creative juices flowing. Spend time browsing kitchen design books, magazines, or online galleries to find inspiration on layouts and features you like. Consider how your family currently uses the kitchen space and what works or doesn’t in your existing setup. Grab a pencil and eraser and loosely draft a few different layout possibilities on paper.
Focus first on the placement of key elements like the sink, stove, refrigerator and any built-in appliances. Then think about window and door locations, traffic flow patterns, and workspace areas. Don’t worry about drawing perfectly to scale at this point – the goal is to bring your ideas to life and experiment with different configurations.
Draw to scale using graph paper
After you’ve sketched some rough layouts, choose one to redraw neatly and accurately using graph paper. Select an appropriate scale like 1/4″ or 1/2″ per foot. Lightly draw the kitchen’s walls, windows, doors, and appliances to scale on graph paper using a ruler. Be sure to include measurements for each element.
Add more detail to your floor plan like cabinet and counter outlines, islands or peninsulas. Continually erase and tweak your layout as needed to optimize the space. Use colored pencils to designate different areas or materials.
Add measurements and labels
To clarify your layout, meticulously add dimensions and informative labels. Mark the length of each wall. Indicate the sizes of every window and door. Include measurements for appliance alcoves, countertops, and all cleared spaces. Identify kitchen zones and work areas with labels like “Prep Area” “Cooktop” and “Cleaning Station.” Mark traffic lanes between work triangles.
Title the floor plan with your project name, date, and scale used. Leave white space to write notes and edits. Number each detail and compile a legend.
Create digital floor plans
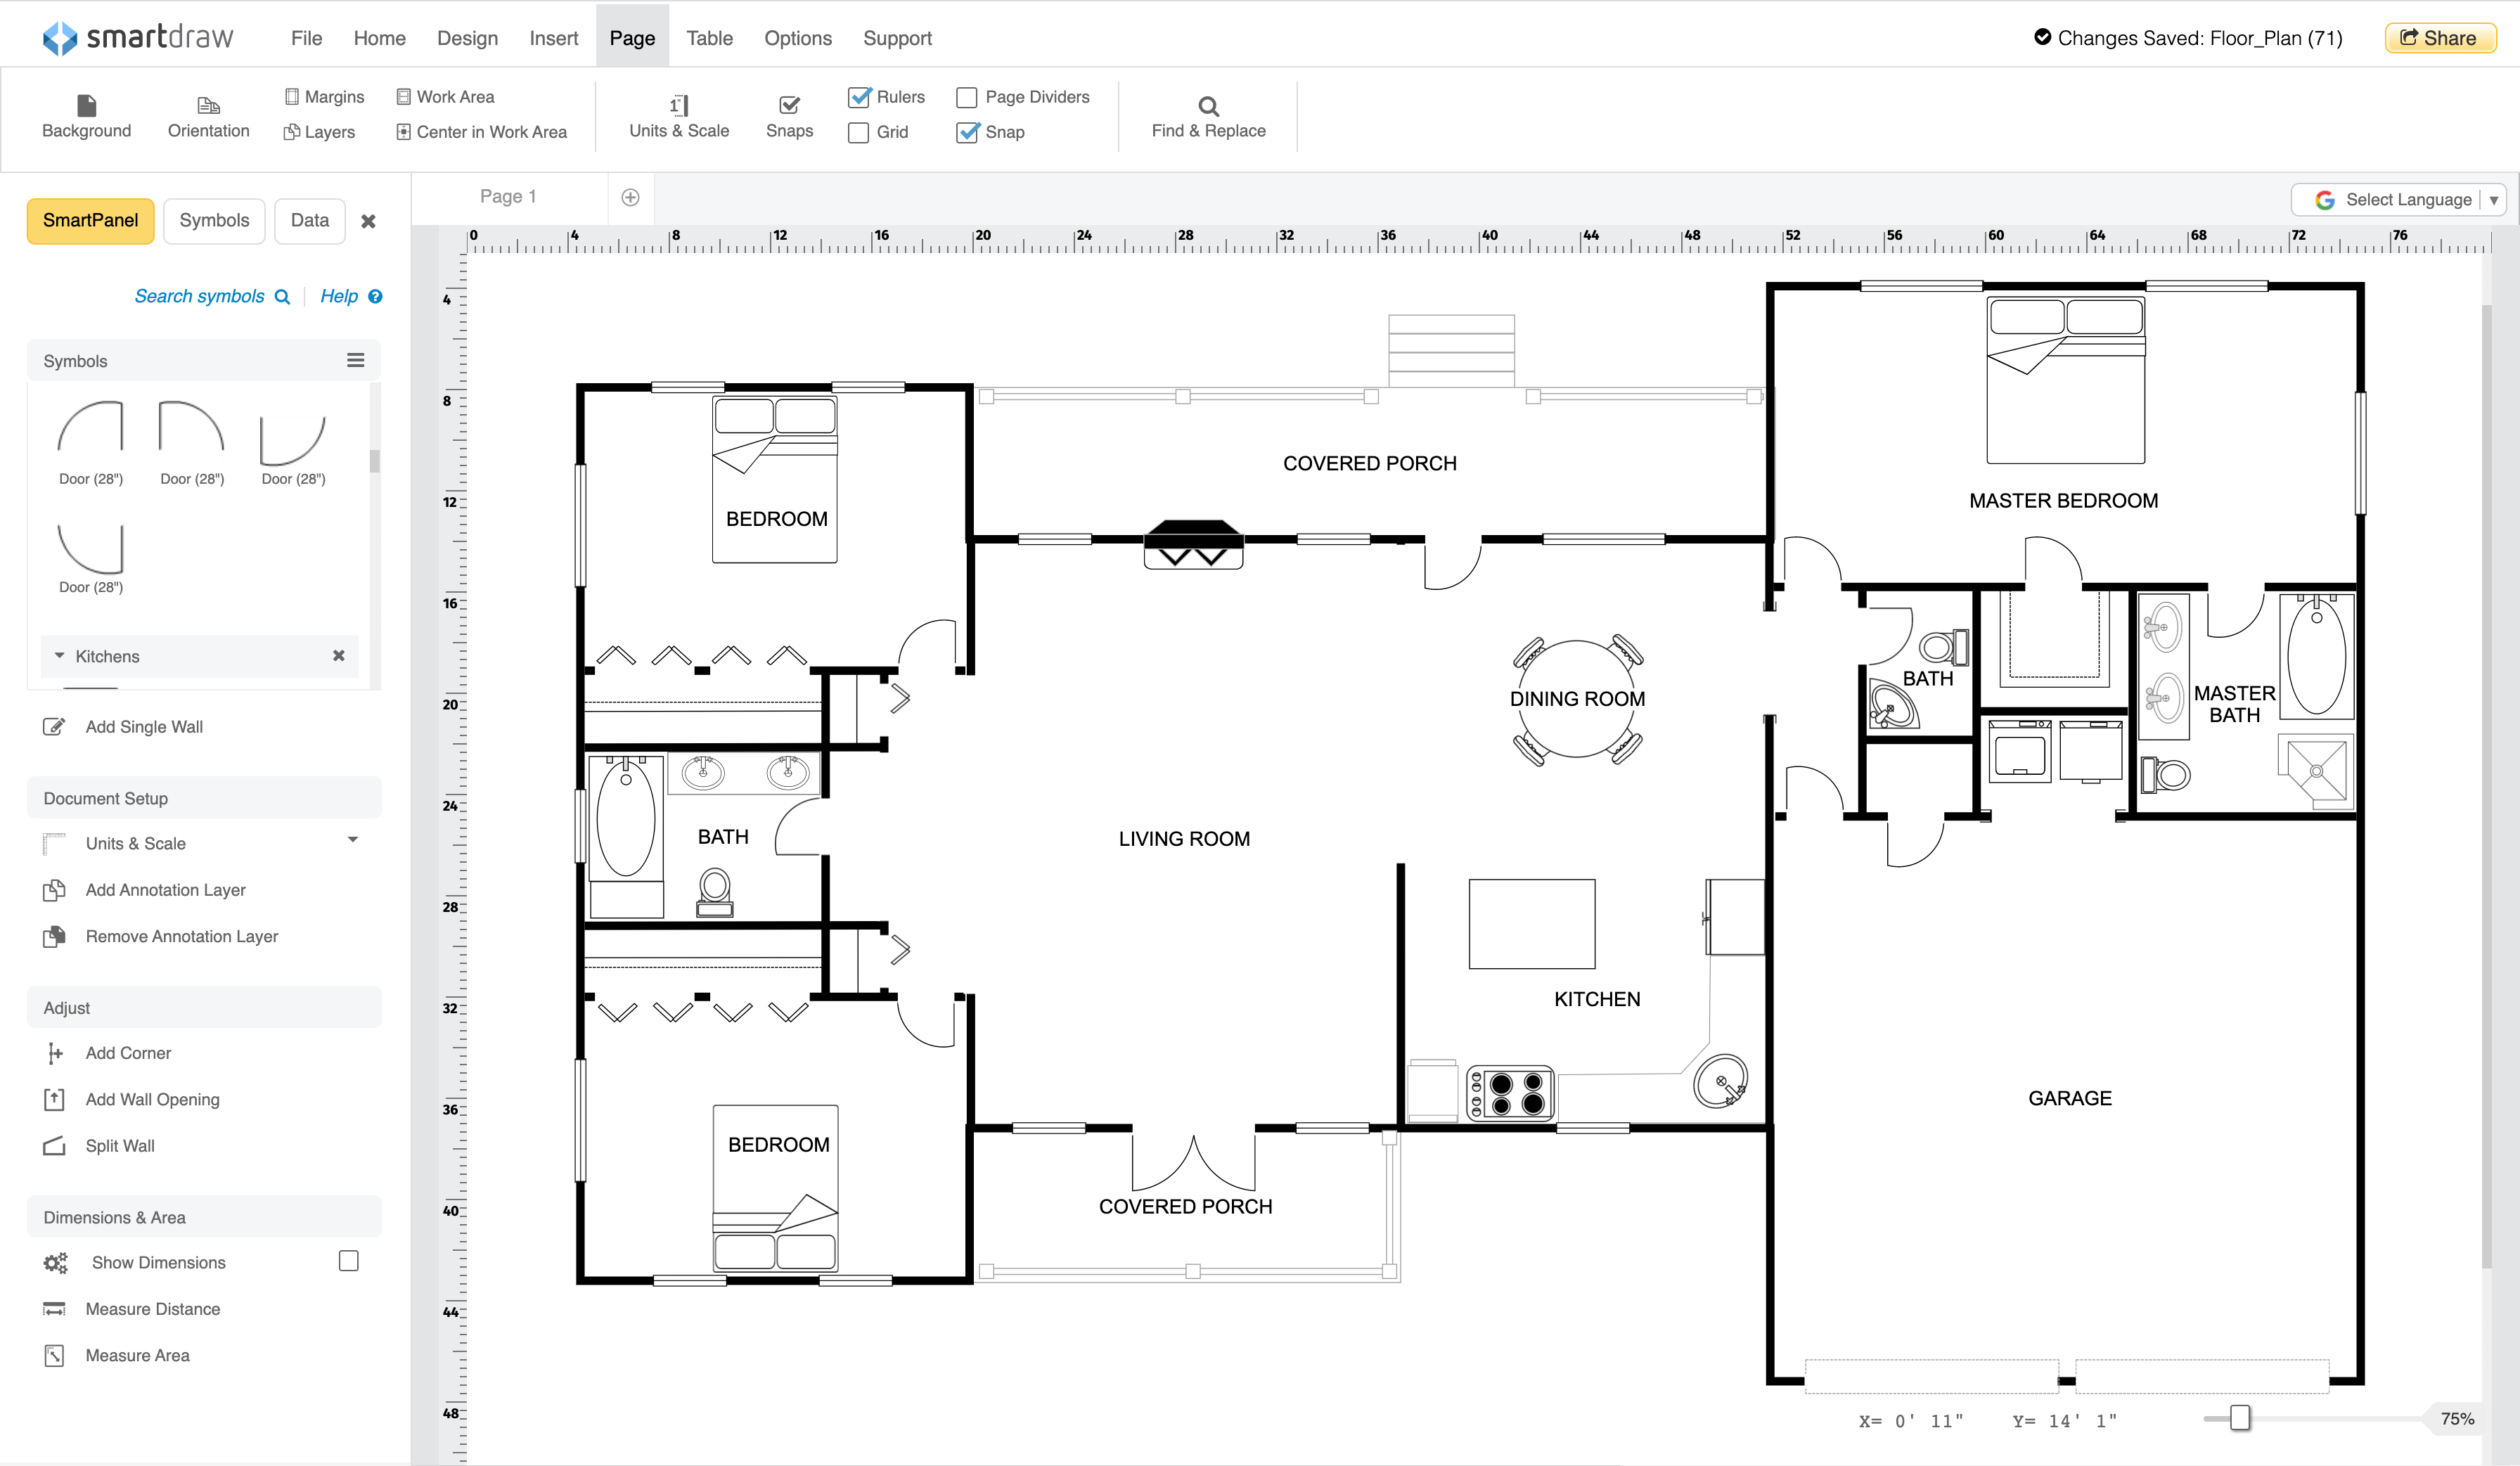
For a polished, professional look, recreate your floor plan digitally using CAD software. Programs like Floorplanner, SmartDraw, or SketchUp allow you to precisely draw your kitchen to scale on a computer. Or consider hiring a kitchen designer to draft a CAD plan for you.
A digital floor plan enables easy editing as you finalize details. It looks clean when printed or shared online to collect feedback before your renovation. Advanced programs let you create 3D renderings or interactive walkthroughs.
Kitchen Floor Plan Layout Options
Kitchen floor plans come in many shapes and sizes to fit your space needs. Choosing the right layout is key to creating a high-functioning, storage-savvy kitchen design. Carefully consider existing room dimensions along with your cooking habits, storage needs and aesthetic preferences when selecting a floor plan.
Beyond maximizing your footprint, you want a layout that accommodates multiple cooks, allows logical workflow between tasks, and suits your entertaining style. Here we explore popular kitchen floor plan configurations and their unique advantages.
Galley
With its parallel countertops lined with cabinets, a galley kitchen floor plan maximizes storage and efficiency in a small space. The streamlined layout accommodates a single cook’s workflow using minimal square footage. Continuous lower cabinets coupled with upper cupboards provide abundant storage nooks and organization potential. Just avoid congestion by ensuring adequate aisle space between the galley sides. This smart, cost-effective design is ideal for optimizing compact kitchens.
L-Shaped
The versatile L-shaped layout joins two adjoining legs of counter and cabinets in an efficient wedge workspace. By leaving one wall open, an L-shaped kitchen feels more spacious and promotes flow between the cooking and dining/living areas. The design can easily adapt to cooks’ needs with customizable cabinet and counter configurations. Just be mindful of potential traffic bottlenecks in the inner corner. This winning option balances enclosure and openness.
U-Shaped
A U-shaped kitchen surrounds the space with counters and cabinets along three walls, anchoring everything in an efficient work triangle. This substantial footprint delivers abundant prep space for multiple cooks plus the potential for a spacious walk-in pantry. But beware of an overly closed-off feel in smaller rooms. Focus on opening sightlines to adjacent spaces to keep things bright and airy. This classic design feels substantial and accommodating.
Island
Introducing an island adds flexible counter and storage space without consuming wall footage. Islands promote open social flow in the kitchen and expand work zones. With accessibility from all sides, an island facilitates smooth traffic patterns. Incorporate seating along an extended side for casual dining. Just be sure to allow ample surrounding floor space so the island enhances rather than hinders movement.
Peninsula
Attaching a slim peninsula to the kitchen provides a happy medium between an island and wall cabinetry. The compact footprint adds workspace and storage while compartmentalizing the cooking area. The minimal protrusion into the floor plan also leaves more room for traffic flow compared to a larger island. Peninsula placement can help separate kitchen and living spaces in an open concept. This smart design enlarges functionality in modest spaces.
Kitchen Floor Plans with Pantry
A well-designed kitchen pantry offers invaluable storage and organization in any floor plan. Dedicated pantries help keep cooking essentials tidy yet easily accessible. There are several options for incorporating a pantry when planning your custom kitchen layout.
Walk-in pantries provide ample space for shelving units, cabinets and closet-style storage. They work best in larger kitchens with the footprint to dedicate floor space. Locate walk-in pantries off the kitchen work triangle near refrigerators for efficient access. Maximize organizational potential with mix-and-match shelving, drawers, racks and cubbies tailored to your needs.
For smaller kitchens, consider a reach-in pantry with shallow depth. These slim but mighty pantries tuck neatly alongside refrigerators or between cabinets. Equip with pull-out drawers, corner lazy susans and vertical storage to hold a lot in a little footprint. A creative barn or pocket door conceals contents when closed.
Butler’s pantries blend storage and prep space between the kitchen and dining room. Ample counters allow staging serving dishes and layouts while cabinets store tableware essentials and less frequently used appliances. Built-in wine racks, sinks, dishwashers and warming drawers maximize functionality.
No matter the footprint, a well-planned pantry promotes efficiency. Determine your organizational needs then tailor the design details accordingly. Proper zoning and plenty of specialized storage options keep your pantry items accessible yet out of sight.
Design for Functionality
When designing your kitchen floor plan, think about zoning areas for different functions:
- Prep zone – Locate near sink with spacious counter space. Allow at least 18-24 inches in depth.
- Cook zone – Position stove/cooktop with ample counters and mixing space on both sides.
- Clean zone – Dishwasher near sink, recycling/trash station close by.
- Storage zone – Base cabinets and pantries for dry goods and small appliances.
To allow room for multiple cooks, ensure your layout has minimum 4 feet between parallel counters and islands, at least 15 inches of counter space per cook, clear walkways between work zones, and multiple prepping/cooking stations.
Maximize every inch by utilizing continuous lower cabinets topped with wall cabinets, roll-out shelves and drawer organizers, a mix of open and closed storage, islands/peninsulas to expand the surface area, multi-level islands for below storage, and corner cabinets and blind spots.
Tips and Inspiration
Clever storage solutions help maximize every inch of kitchen space. Opt for cabinet inserts, lazy susans, and pull-out shelves to fully utilize awkward corners and deep cabinets. Multi-level islands provide concealed storage. For small kitchens, go vertical with wall-mounted racks and floating shelves.
Blend stellar form and smart function by choosing appliances and fixtures that optimize efficiency while looking sleek. Streamlined cabinetry makes compact kitchens feel more expansive. Space-saving sliding barn doors improve flow.
Adapting floor plans is crucial for petite kitchens. Stick to one-wall galley or L-shaped designs. Mirrored backsplashes create the illusion of roominess. An open-concept plan connects the kitchen to the dining and living areas for better visibility.
Knocking down walls for an open concept works well in family homes by promoting natural traffic flow. With open sight lines, you can monitor kids while cooking and bring everyone together. Just strategically place messy zones away from other areas.
Whether you value entertaining, frequently cook solo, or need room for the whole family, a purposeful floorplan ensures your new kitchen both looks amazing and works effortlessly. Follow our guide to get the ball rolling. Then have fun sketching, planning and dreaming up your ideal kitchen hub. The joy is in the journey from blank slate to a beautifully organized and efficient heart of your home.