Spice Up Your Curtains With DIY Tieback Ideas
Adding tiebacks is an easy way to elevate your curtains and pull together your window decor. But instead of buying readymade tiebacks, why not have fun making your own? DIY tiebacks allow you to match your style and custom coordinate with your curtains.
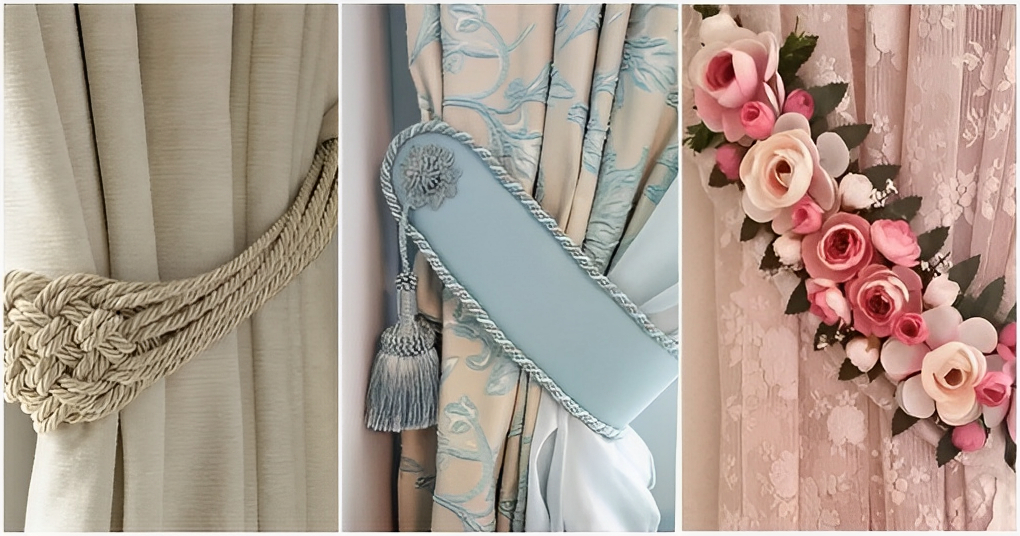
Whether you want elegant tassels, fabric rose bursts, or braided cotton rope, the options for handcrafted tiebacks are endless.
Making DIY tiebacks is also a budget-friendly project using materials you already have at home. Old t-shirts, socks, ribbons, and more can be repurposed into beautiful backdrops for your curtains. And if you love to craft, tiebacks are a quick and satisfying project that allows you to flex your skills.
Curtain Tieback Styles to Inspire Your DIY Designs
First, think about what tieback shapes and textures will work best with your curtains and decor. Here are some stylish options to spark ideas for your own DIY tieback designs:
Textured Fabrics
Swaths of burlap, lace, brocade or any fabric with an interesting texture make for elegant tiebacks. The fabric design itself adds visual appeal when contrasted against your curtains. For a glamorous look, use patterned silks or satins. Or go natural with linen, burlap or cotton in earthy hues.
Fabric strips can be twisted, braided or simply tied onto curtain rods as easy no-sew tiebacks. More ambitious sewers could make distinct shapes like ruffles, bows or flowers out of special fabrics.
Tassels and Fringe
Long tassels and fringe swinging beside your curtains add movement and sophistication. Match colors or use tassels in complementary shades that pop against your drapes. Organic rattan, faux suede, or shiny metallic tassels are all statements.
For DIY tassel tiebacks, wrap embroidery floss or ribbon around a piece of cardboard. Then cut along the bottom edge, fluff up the strands, and knot the top. Add beaded strands for even more texture and color.
Braided Cords
Braided rope in cotton, jute or glossy satin ribbon lends a handmade look like your tiebacks were crafted over time with care. Play with different sized plaits and experiment with unconventional “rope” materials like t-shirt yarn or cut fabric strips. Mismatched colors woven together make fun ombre effects.
Basic 3-strand braiding is easy to DIY. Simply divide your tieback material into three equal strands and begin weaving the outer strands over the middle strand toward the center. Continue down the length.
Beaded Strands
For an exotic Moroccan vibe, tiebacks made of beads are a glam choice. Use coordinating beads in all one color or combine multiple shades and shapes for interest. Sparkling crystals, wood beads, or matte stone beads all impart texture and catch the light beautifully.
DIY beaded curtain tiebacks by threading beads onto a long fishing line or thin cord. Space beads close together or in unique patterns. Knot the ends and trim any excess line for a professional finish.
DIY Tieback Materials to Use
Ready to start crafting your own tiebacks? Raiding your craft supplies and home decor stash will yield all sorts of materials to DIY unique designs.
Fabric Scraps
Check your sewing box and fabric remnants to reuse old t-shirts, socks, handkerchiefs, or fabric squares. Upcycle silk scarves, lace doilies, felt pieces, burlap sacks, velvet—anything goes! Cut or twist fabric into the shapes you envision.
Ribbon
Both wide and narrow ribbons offer possibilities for DIY tiebacks. Wide ribbons can be gathered into lush loops, poufs or rosettes. Narrow ribbon is perfect for braiding, knotting or weaving through decorative rings.
Rope or Twine
For a casual, organic look, cotton rope or jute twine are fitting choices. Braid together different colored strands. Or wrap lengths of rope through wooden beads, sea shells or hammered metal rings.
Leather, Suede, or Felt
Leather, suede or felt add a polished, elevated look in any shape. Cut strips into customizable lengths. Punch holes and lace through metal grommets. Glue on embellishments like studs, beads or embroidery for interest.
DIY Tieback Techniques and Instructions
Ready to get your hands busy? Here are a few easy tutorials for beginner tieback projects to create with basic materials and simple techniques.
No Sew Fabric Strips
Cut or tear fabric into 1-2 inch wide strips. Decide whether to use a single long strip or several strips tied together. Wrap the fabric around the curtain rod and tie a firm knot close to the window. Trim any ragged edges for a clean look.
Braided Fabric Cord
Cut strips about 2 inches wide and at least 30 inches long out of 3 coordinating fabrics. Attach the ends together and braid a simple 3-strand plait down the length. Knot tightly at the ends when finished.
Ribbon Rose Tieback
- Choose a wide ribbon at least 10 inches long.
- Gather the ribbon accordion-style into a rosette shape.
- Wrap floral wire around the center to hold the folds together.
- Trim any uneven edges and fluff the rosette.
- Hot glue a ribbon loop or clip on the back to attach to the curtain rod.
Beaded Curtain Tieback
See the beaded tieback instructions above. Use fishing lines and decorate with any style of beads your heart desires! Add extra bead embellishments for more texture.
Display Your New Tiebacks With Style
Once your fabulous DIY tiebacks are complete, it’s time to show them off! Here are tips for positioning your tiebacks to best accent your window.
Hang tiebacks about 6-12 inches away from the window frame on either side. This gives tiebacks a good hold on most standard curtains while keeping the window accessible.
Place tiebacks towards the outer edges of the curtain rod rather than in the center. Allowing the middle drape to billow out gives a fuller, more lush look.
Change out your tiebacks seasonally or for holidays to refresh your room. It’s an easy switch that makes a big visual impact.
DIY tiebacks allow you to coordinate with your decor and show off your crafting creativity. Whether you prefer a 20-minute no-sew project or a more complex design, the possibilities are endless. As you glance at your windows dressed up with your handmade tiebacks, you’ll feel a sense of pride and inspiration every time.